Wednesday, October 27, 2010

Daring Bakers October 2010: Operation Donut. or Doughnut.

The October 2010 Daring Bakers challenge was hosted by Lori of Butter Me Up. Lori chose to challenge DBers to make doughnuts. She used several sources for her recipes including Alton Brown, Nancy Silverton, Kate Neumann and Epicurious.


Ah, the Donut. Or Doughnut. That bane of the health conscious, foe of waistlines and hips, and destroyer of willpower...

Would it be an understatement that even though I try to shun that poor, sweet thing called "donut", I was giddy with anticipation? When I saw the reveal for this month's challenge, even though I'm hugely fond of Alton Brown and Nancy Silverton, I over-zealously thought of all the bookmarks for donuts (or doughnuts) that I've added to my arsenal this year. Added, and haven't made, mind you. As our challenge was not to use any specific recipe, but to "just make doughnuts!", I immediately, given my preoccupation with all things sourdough, I knew I'd have to try a sourdough version - and figured, while I was at it, maybe I'd veganize it to boot. But more on that later. First, I'd like to divulge the success of my first attempt at making (and eating) baked doughnuts.


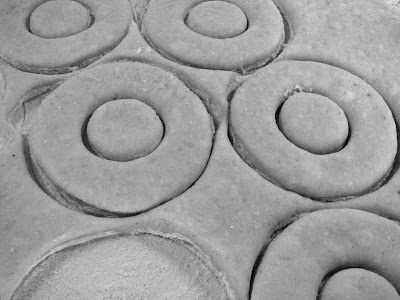
The lightest, fluffiest dough - easy to roll on a floured towel.

Doughnuts indeed have worldwide appeal. They are found in various forms all over the planet, from savory Indian versions, to red bean or sesame filled versions made of rice in South Korea. Personally, I do hear the siren call of the doughnut, particularly while visiting my Parents, and am able to visit the rural Amish bakeries on Saturday mornings. Tiny shops pop up to life once a week around the idyllic, Wisconsin countryside: "pole shed" buildings most of the time, that once entered rob you of any thought of self-control. There are all types of doughnuts under these roofs, raised and glazed and filled and drizzled, and waiting on baker's trays just calling your name. (These shops always have other baked goods, berry and fruit pies coming from steaming wood fired ovens, bags full of homemade dried eggs noodles in various thicknesses and often, home preserves of various sorts.) It's easy to get carried away, and spend the rest of the morning, tearing off bite sized pieces of full fledged adult sized doughnuts, so as not to really know how much you are consuming.

When I finally settled on making doughnuts of my own, I figured, I would of course make a baked version, and then finally settled on this one from the Chabad.org website. It is a gem of a recipe, and has warm, delicious doughnuts on your table (and gracing your waistline) in about 2 hours. I opted for the creamy, buttery glaze since I was so virtuous in the baking and not frying of these lovelies, and that, friends, was the proper choice.


For the recipe as listed, my yield was 8 full size doughnuts and about 30 donut holes. I used two sizes of biscuit cutters to form my doughnuts (a 3 7/16 inch cutter for the doughnut and a 1 1/2 inch cutter for the holes). I did re-roll my scraps, and made additional holes. After all, when you have bite sized bits, it's so much easier to guiltlessly eat them. They are so small! You hardly know that they are being ingested!

The dough is so soft and easy to work with, the gentlest amount of rolling on a heavily floured towel prevents any sticking. And, it's true, a homemade and baked doughnut has got to be better for you than any Dunkin', Horton, or Amish made substitute.


  • 2 packages dry yeast (about 35 grams of fresh, or 2 scant Tablespoons
  • 1/4 cup warm water
  • 1-1/2 cups milk, scalded and cooled
  • 1/2 cup sugar
  • 1 teaspoon salt
  • 1 teaspoon nutmeg
  • 1/4 teaspoon cinnamon (optional)
  • 2 eggs
  • 1/3 cup shortening (I used Spectrum Organic)
  • 4-1/2 cups flour

In a large mixer bowl, dissolve yeast in warm water. Add milk, sugar, salt, spice, eggs, shortening and 2 cups flour. Blend 1/2 minute at medium speed, scraping bowl occasionally. Stir in remaining flour until smooth, scraping sides of bowl. Cover. Let rise in warm place until double (50 to 60 minutes).

Turn dough onto well-floured cloth-covered board; roll around lightly to coat with flour. Dough will be soft to handle.

With floured, stockinette-covered rolling pin, gently roll dough about ½ inch thick. Cut with floured 2-1/2 inch doughnut cutter. Lift doughnuts carefully with spatula and place 2 inches apart on greased cookie sheet. Brush doughnuts with melted butter. Cover; let rise until double (about 20 minutes).

Heat oven to 420° F. Bake 8 to 10 minutes or until golden. Immediately brush with melted margarine or butter and shake in Cinnamon Sugar or spread with Creamy Glaze (recipes below). Makes 1-1/2 to 2 dozen doughnuts.

Toppings (best if made while doughnuts are baking):

Cinnamon Sugar
  • 1/2 cup sugar and
  • 1/2 teaspoon cinnamon

Creamy Glaze:
Melt 1/3 cup butter. Blend in 2 cups powdered sugar and 1-1/2 teaspoons vanilla. Stir in 4 to 6 Tablespoons water, one at a time, until melted glaze is of proper consistency.

Note (from Chabad.org): It's true; the dough does not have to be kneaded. This gives an extremely light and loose dough. I did not use a cloth or stockinette; a floured surface and floured rolling pin were sufficient. With the dough so light, a feather touch rolls it out. Nonetheless, the doughnuts rolled out from the "scraps" of dough did come out thicker and nicer. I did not brush them with butter either before or after baking, with no apparent harm (since I was using glaze instead of cinnamon sugar).


I also did not brush with butter, since I used the creamy glaze. These were best right out of the oven, but were still good a few hours later. I think it'd be best to serve these when you have a houseful of people to please for breakfast some winter morning. They were not quite as good after they cooled, but it didn't stop me from continuing to eat them...

Hot, they were light and amazing like a properly fried doughnut, sans any guilt - especially when eating a number of the donut holes:


Later in the month, I decided that I HAD to try a vegan and sourdough version. I based my effort on this doughnut from Apricosa. Most impressive, was that my dough actually rose, albeit very slowly. I let the dough stand for 18 hours or longer before rolling out into doughnuts, and let the doughnuts rise about 8 hours before trying to bake them. I used soy milk, and flax instead of eggs, and 1/4 c. sourdough starter for the leavening agent. I was so hoping I'd bite into a hot doughnut and be so smitten and overjoyed that I'd go into business for myself hawking vegan sourdough baked donuts. Not so much. They were edible, but not "donutty" enough for me. Pleasantly sour and very breadlike, I dipped them in soy milk and then a vanilla sugar topping before my taste test. Just all right, nothing to write home about. But, as is the case of easily devoured, bite-sized donut holes, my visiting Mom and I ate our share (and then decided to break out the non-vegan creamy glaze that was leftover from the last batch) and try some more. Even my Husband ate several before declaring that the last batch was way better. I know. I tried.


And so a very satisfying and fun Daring Baker month has once again come to a close. As the wind roars and October has decided to behave more like himself, I'm thinking of making more doughnuts (of the baked variety), and even trying to get a sourdough version to work to my specifications for a doughnut: sweet, soft, and a bit bad for me - like most good things in the dessert world.

Thank you to Lori for a very good choice in Daring Baker challenges! This month, I learned a bit more about baking and dough, happened to find a creamy glaze worth daydreaming about, and am still feeling rather virtuous in my pursuits of healthy dessertdom. All, undeniably priceless.


Monday, October 25, 2010

Vegan Monday: Spicy Biriyani

Not only do I love spicy food, but I love the word "spicy". In cooking, it so often denotes when something is hot or sharp in flavor, but I get excited when I see true spicy spices like cinnamon working hard and in tandem with more traditional definitions, turning something that would otherwise be a bit bland into something "awake" and exciting.

That is what I thought about when I was making this biriyani last Thursday. I had seen the recipe at Saveur quite a long while ago, and bookmarked it. The original recipe calls for chicken, but seeing as I had a block of tofu that needed using, I decided to marinate and bake it using the same flavors called for in the chicken. I then upped the amount of peppers in the rice, using a combination of jalapeno, red, orange and green peppers. Though you would be hard pressed to see them in the final picture, they are there I assure you.


I pressed the tofu to remove any additional water (I like our local Simple Soyman brand best) for about an hour before marinating and then baking. Since I had the time, I actually let the tofu sit for several hours in the marinade before baking it, but you probably wouldn't have to. I also was happy to discover that I could practically "juice" a jalapeno by grating it on the microplane - and it also allowed for less cleanup.

I baked the tofu and made the rice separately, and then tossed them together to serve. Even my Husband liked this (and had 2 servings!), a huge boost to my ego after he came from a shopping trip in which he purchased jam. (I have an entire shelf dedicated to homemade jams and jellies in my basement...) To store the leftovers, everything was combined. It was even better cold a couple of days later.


I don't really measure things when making baked tofu... I just add as much as I feel like, and make sure not to use too much oil so that the tofu develops that little bit of crispness around the edges as it bakes. That said, the spice mix below is approximate!

Spicy Baked Tofu
  • 1 package (16 oz or so) firm tofu (not silken)
  • 1 T. olive oil
  • 3/4 of a jalapeno, grated
  • 1/2 t. ground coriander
  • 1 T. grated ginger root
  • 1-2 t. cassia cinnamon
  • salt and pepper to taste
Cut the block of tofu in half horizontally (the Simple Soyman blocks are almost square sometimes...) and press between two towel lined plates for at least a half hour to remove any excess moisture. Meanwhile, mix remaining ingredients in a glass baking dish (9x9 works well).

After pressing, cut the two halves in half horizontally again, so you have 4 slabs about 3/4 inch thick. Dredge in marinade, and coat all sides well. Let sit for awhile, or bake right away as you prefer.

When ready to bake, preheat oven to 400 degrees. Bake the tofu for 30-40 minutes, flipping over every 10, until the marinade has absorbed and the tofu looks semi-dry and "baked".

I ate a half of a square while working on the rest of the recipe:


A lot of the same flavors appear again in the rice, and the same thing applies. You can add or subtract as you like. The original recipe also called for soaking the rice. I have read that some types of basmati need soaking, and others don't. I typically don't soak the Tilda brand that I use, but did this time, just to follow instruction. You can or not - if you choose to, just soak for 20 minutes, then drain and rinse and proceed with the recipe.

Vegan Spicy Biriyani (adapted from Saveur)
  • 1 c. basmati rice
  • 2-3 T. coconut oil
  • 2-3 chiles de arbol, crumbled by hand
  • 1 medium onion (I used a white one), chopped medium
  • 2 cloves garlic, thinly sliced
  • ginger root, about 2 inches, grated
  • 2 t. cassia (Saigon) cinnamon
  • 1 jalapeno, sliced and/or chopped finely
  • 1/2 red pepper, finely diced
  • 1/4 orange pepper, finely diced
  • 1/4 green pepper, finely diced
  • a lot of cilantro
  • salt and pepper
(If you would like to put it in the oven to bake, you can time it to go in around the same time as the tofu is coming out: preheat the oven, or reduce the heat, to 350. You could also do the whole dish on the stovetop, the cooking times would be about the same. I used the oven for this instance.)

In a large, lidded saute pan, heat the coconut oil. Add the onion, sliced garlic and spices, and saute until the onions soften, about 6 minutes. Towards the end of the saute time, add the peppers, and let sweat for a minute or two.

Add the rice, along with 1 1/4 cups of water and 1 teaspoon of salt (you can add more later if you like). Bring up to a boil, and (if cooking on the stovetop), reduce heat to low and cook covered for 15 minutes before checking to see if the rice has absorbed most of the liquid and that it is tender. I like to let it sit off the heat for about 10 minutes with a kitchen towel between the lid and the pan to let it continue to steam. If you are baking it, after it boils, pop the lidded pan in the oven, and let it bake for 15-20 minutes, checking on progress of the rice around the 15 minute mark.

Using either method, let it stand several minutes before eating, and toss with the tofu and lots of chopped cilantro. In our case, you will also need to serve with a bit of Mae Ploy Sweet Chile Sauce.


With all the focus on local eating, I should be ashamed that I insist on foreign basmati rice. A few years ago, when I discovered that cooking rice wasn't a science that I needed to attend school to get to know, I visited an ethnic grocer looking for the famed Tilda brand of basmati rice. At that time, I couldn't find it, and went with Swad, a similarly delicious import. As with most specialty foods that at one time seemed scarce in my neck of the proverbial woods, Tilda is now relatively easy to find, and worth every extra cent it costs. All of the flavor of the faraway place can be found in that rice, and when I eat it, I think of the many many people worldwide who have a staple diet of rice. I also think of all the foods in that part of the world that I've never experienced, or that in general, I just know so little about. It has an overwhelming amount to offer me! Maybe that will be my next adventure: the foodstuffs of India and surrounding regions. I like not knowing what comes next from my kitchen... I'll likely wait a bit to embark on a new full-out obsession, since the sourdough is overtaking me and my reading habits lately.

(Lastly, an extra special thank you to Mary-Catherine for telling me that you like my Vegan Mondays. It really inspired me to get my act together and think consciously about making one interesting vegan thing a week to write about. I'm not eating a meat-heavy diet, but it's nice to have that extra little nudge of encouragement! :) )

Saturday, October 23, 2010

Essence of Autumn: Pumpkin

It's Fall, finally. Although today was in the 60's, our misguided October of 2010 has determined to let the leaves linger mostly on the trees while we soak up the rapidly shortening days in relative comfort. Traditionally, our October is a cold and often mean month, saturated with rain and requiring me to lament over the lack of a coat I can never seem to buy. (Oh, I have a huge parka, comfort rated by L.L. Bean to like 50 below zero, but I have no "stylish, walking around in usually sweltering stores" coat.)

I often feel so fortunate that we have 4 seasons; I couldn't even tell you my favorite if you asked. The brink of each brings it's own unique set of loves and enjoyment - I doubt I'd be so excited to garden and mow the lawn if I never saw the barren and bleak snow covered yard for what, at the time, seems like an eternity.

Our circle of seasons reminds me of life on a more specialized scale. Lately, and more specifically, my experiments with fermentation seem to echo life and our seasons - first with spurts of growth and then the maintaining, next a slowness created by increasing chill and, finally, inevitable death if not cared for properly (and sometimes even if cared for properly). Seasonal living really is extraordinary, and worth appreciating as often as I think of it. And, while I don't crave it in the Spring and Summer, some things are just inherently Autumn and the Autumnal onset brings with it my cravings for pumpkin and the endless tweaking of the classic pie.


Pumpkin pie is probably one of my top loves. It is home. It requires a modicum of beforehand thought since it takes a long time to bake, and an even longer time to cool down before that first slice can be wedged out and properly plated with appropriate amounts of ether whipped heavy cream or ice cream. I hardly know a person who doesn't love it, and if you hate making a pie crust, filling a supermarket readymade cheat will also provide nearly as much gustatorial enjoyment as the olfactorial treat you get when the whole house smells of spiced pumpkin. (Never mind if I'm introducing new words to the English Language here, I just get excited about pumpkin!)

My first pies of this season were not actually pies, but rather miniature tarts that I stole from Heidi at 101 Cookbooks. Any time I read over a recipe and see that coconut milk has been substituted for something, I get pretty excited. I also took a nod from my Mother, and decreased the amount of said milk, since it produces a richer, more custardy version - and Heidi's addition of an extra egg or two also help with that. Heidi also includes a layer of hazelnuts - boosting that Autumnal feel of this dessert sevenfold. It's good. No, it's Love.


Of course, you can use whatever pie crust you like - I opted for Dorie Greenspan's Pate Sablee. I mixed it up in the food pro, and pressed it into the 4 inch tart tins. For each tin, I used 1/2 c. plus 2 T. of crumbly dough, and a single recipe of her pastry perfectly fills 5 shells.

Pumpkin Custard Tarts (adapted from 101 Cookbooks)
makes 5 4 inch tarts, or 1 9 inch pie
  • 2 c. hazelnuts
  • 1/2 c. dark brown sugar
  • 1 T. pumpkin pie spice (I slightly altered the 101 Cookbooks one, and listed it below)
  • 1 t. salt
  • 1 T. cornstarch (or arrowroot)
  • 1 can (1 1/2 c.) pumpkin puree
  • 1 t. vanilla extract
  • 3 eggs, lightly beaten
  • half a can of coconut milk (about 6 oz. If doubling the amounts for two pies or 10 tarts, use a whole can (13+ oz.) of coconut milk)
Preheat oven to 350.

Puree 1 1/2 cups of the toasted hazelnuts in a food processor until they turn into a hazelnut paste, past the 'crumble' stage. I added a teaspoon or so of maple syrup to help it along. Set aside. Chop the remaining 1/2 cup of hazelnuts and set aside to use as garnish.

To make the pumpkin pie filling, whisk together the brown sugar, pumpkin pie spice blend, salt, and cornstarch (or arrowroot). Stir in the pumpkin puree, and vanilla, then stir in the eggs and coconut milk until just combined. Set aside.

Before filling the pie crust, crumble the hazelnut paste on top of the pie dough into the pie plate, quickly and gently press it into a thin layer across the bottom creating a layer of hazelnuts that will sit between the dough and the filling. Fill the pie crust with the filling. Fill the tins fairly full - (it will puff up a little as it bakes, then fall slightly as it cools, ) and bake for 35-40 minutes (up to 50 minutes or so for the pie). For the 4 inch tarts, I used a heaping 1/3 cup of filling in each... and then baked off any remaining pumpkin custard in ramekins. The center of the pie should just barely jiggle when you tap the pans, the edges should be set, and a thin knife inserted at the centers should come out cleanly.

Let the tarts cool fully before digging in. I like to think that it lets everything "marry" nicely. Of course you can eat them how you wish. Serve plain, or with barely sweetened whipped cream and a sprinkling of chopped hazelnuts, or with ice cream.

Pumpkin Pie Spice (adapted from Kathy FitzHenry, via 101 cookbooks)
  • 1 T. cassia (Saigon) cinnamon
  • heaping 1/2 t. allspice
  • 1/4 t. cloves
  • 1 1/2 t. ground ginger
Dorie's Pate Sablee: (Baking: From My Home to Yours)
  • 1 1/2 cups all-purpose flour
  • 1/2 cup confectioner's sugar (powdered sugar)
  • 1/4 tsp. salt
  • 1 stick plus 1 tablespoon (9 tablespoons) very cold (or frozen) unsalted butter, cut into small pieces
  • 1 large egg yolk
Put the flour, confectioners' sugar and salt in a food processor and pulse a couple of times to combine.

Scatter the pieces of butter over the dry ingredients and pulse until the butter is coarsely cut in--you should have some pieces the size of oatmeal flakes and some the size of peas.

Stir the yolk, just to break it up, and add it a little at a time, pulsing after each addition. When the egg is in, process in long pulses--about 10 seconds each--until the dough, whisk will look granular soon after the egg is added, forms clumps and curds. You may need to add a tiny bit of ice water if the dough doesn't stay together when pinched.

(You can gather the dough up into a ball, and gently knead it out into a disk, then roll on a floured surface like a traditional pie dough. But, it also works to simply pat it out into the tart shell.)


I'm a glutton for Cassia cinnamon. I first tasted it's spicy, red hot related flavor at the Spice House, and ever since I have to stock both "True Cinnamon" and Saigon Cassia Cinnamon in my spice pantry. It is so addicting, a fully unique cinnamon experience. I made these tarts a couple of different times this week, and dusted some with extra cinnamon, as my Mom also does, for looks and for extra spicy cinnamon kick.


I'm sure these are just the first of the pies to take me through to the new year. I have a couple of pie pumpkins that need the roasting and puree treatment, something I generally leave to Libby's since I actually really like the flavor of canned pumpkin.

It's not too often that I like some prepared and out of a store-bought can, but canned pumpkin is one of those things, and as this FoodinJars post reminds us, it isn't advisable for home canning in any form anyway. So, go ahead and add a sauteed leek or onion, maybe some celery and a carrot, (chile flake of course) and in mere moments your can of store pumpkin can turn into a lovely soup. Pancakes and muffins too, all perfectly accepting of a can of pumpkin. I like the cheat once in a while, and with the brevity of Fall in full swing, I'll be sure to indulge frequently.

Monday, October 18, 2010

Vegan Monday: Sourdough Peanut Butter Blondies.


Directly after finishing last Vegan Monday's Chocolate Sourdough cake, my fervor for all things sourdough led me on a quest for more sourdough desserts. Whilst looking at too much information, I found that I really can use sourdough starter in any baked good if I use this proportion: 1 cup of sourdough starter = 1/4 c. flour and 1/2 c. liquid. It seems logical to me, and it made this already great recipe into something even a bit healthier, at least in my own opinion.

I turned once again to Vegan Cookies Invade Your Cookie Jar by Isa Chandra Moskowitz & Terry Hope Romero. (I still have these books on loan from Ginny, and it's embarrassing that I haven't even thought of returning them. You'll likely receive them back with some baked goods, Ginny - hope that makes up for my negligence!!) I am usually a chocolate person. I like chocolate with peanut butter, but not peanut butter with chocolate. Well, this recipe changed all that. It's fudgey and peanutty, thick and dense but not too rich. The perfect non-chocolate brownie.


I omitted the salt from the batter since I only had salted peanuts on hand for the top, and it was a horrible error. The blondies were still great, but missing that once nuance. Nothing a little homemade chocolate syrup (and *gasp*, a little homemade ice cream) didn't cure, but I won't omit it in the future.

Vegan Sourdough Peanut Butter Blondies (adapted from Isa Chandra Moskowitz & Terry Hope Romero)
  • 3/4 c. peanut butter (I used smooth, plain peanut butter from my co-op. Ingredient list: peanuts.)
  • 1 c. sourdough starter
  • half of a 1/3 c. measure of oil (I used coconut oil, and eyeballed it)
  • 1 c. brown sugar
  • 2 t. vanilla extract
  • 1/2 c. whole wheat flour
  • 1/2 t. baking powder
  • 1/2 t. salt
  • 1/3 c. peanuts (for the top - I didn't measure)
Preheat oven to 350. The girls say to use a 8x8 square metal baking dish, but I don't have one, so I used an 8 inch cake tin, and it worked fine. Lightly grease your baking container of choice.

In a large bowl, mix together peanut butter, oil and brown sugar. Mix well, until well incorporated. Add the sourdough starter and vanilla, and blend in thoroughly.

Stir in flour, baking powder, and salt. Mix the dough (using your hands if you need to) well. The batter is very thick, and doesn't spread on it's own. Transfer dough to baking tin, press into sides, and press the peanuts into the top.

Bake for 25-30 minutes, until set and lightly browned on top. Cool completely in tin before slicing.


There isn't much more to say about these beauties. They are what they purport to be, and they are delicious. No one would guess they are vegan, and any die hard peanut fans can rest assured that a peanut craving will be satiated. This pan is long gone, but I feel like I want to make another one.


Oh, it's so easy for me to fall head over heels for sweets during this time of year. From the first whisper of cool weather straight on til January, I feel like I'm entitled to make (and, by default, eat) any and all sweets my heart desires - and fortunately December allows me to give away to my hearts content. By the time January rolls around, I'm easily reconditioned. In time and solidarity with other resolution-makers, I want no sugar whatsoever, and I want to be a virtuous and healthy eater, free of the entrapments of my all mighty sweet tooth.

I have to make a serious pact with myself to eat less sugar, at least until Thanksgiving. Part of the problem, is that I just love to bake, and falling leaves and brisk, humidity free days only serve to add fuel to the fire. But now that I've made actual bread with my starter, I have less excuse to want to use up starter in hollow caloric and fleeting deliciousness, and can concentrate on more healthful endeavors. Wish me luck!

Friday, October 15, 2010

Sourdough Success!

Well, here it is:


my first loaf of Wisconsin sourdough bread. It is 100% naturally leavened, the power of it's rising I've decided to attribute to the addition of rye flour to my starter a couple of weeks ago. Ever since I started feeding my starter the diet variety, he has done nothing but thrive - and I am now proud to offer up portions of starter to any Milwaukee area bakers who are interested! (Just email me for details: unless I have people storming casa rcakewalk, I'm more than happy to give you your very own portion for free!)

In no small amount, I owe this loaf to Breadtopia - a small website and company devoted to assisting and reassuring home bakers like me. I used the recipe on their site for No-Knead Sourdough bread, a similar composition to my ever-loved Lahey bread but containing starter in lieu of any commercial yeast. Given my previous failures using my natural leavener, I didn't fully expect my dough to even rise. I mixed it up yesterday afternoon at 2:00 PM, and by 6:30 this morning:


it had raised miraculously to the top of my bowl! I could hardly wait to bake it. Since I ordered it with my last King Arthur Flour purchases, I've been trying to work with a brotform, a coiled cane rising basket. I've tried coating it with flour, wheat bran, oat bran, and combinations of all three, and have had problems with the dough sticking to the sides. Yes, I realize that mostly I'm using fairly wet dough (something that is a safeguard in producing "holey" bread) and that my basket isn't seasoned with years of wear. Fortunately, even after my loaf stuck miserably to the side when I was flipping it over into a pot heated to 500 degrees, it still rose and baked into a thing of beauty.


I know, I'm biased. But it's my baby, and he's all grown up. Producing bread from home is probably one of my greatest joys. It still seems unreal to me that humans have been making bread, or types of bread, for so long. The things that our planet is able to give us continue to astound me daily; the vast variety to make the human experience enjoyable and delicious is too great to comprehend. Nothing can be more natural than capturing wild yeast and putting it to work in flour and water, 3 ingredients that can do so much more than stave off hunger. Bread is the ultimate health food, the staff of life, and it's not to be taken lightly.

At the same time, it's worthy of noting, You can make bread. Anyone can. With such a small monetary investment, a bit of patience and determination, you can make something from almost nothing, and you can make it to your own specifications. The more often you practice, the more you will know and understand how dough works. So many describe the process as therapeutic, which I can agree with, but more so I feel that when I work with dough I'm doing something that connects me to almost every culture on the planet. I can learn so much from making flatbreads from India, or tortillas from different regions in Mexico, about the differences in atmosphere and ethnicity, anthropological truths and variances that I'd never have learned about in school.


Sourdough, I suppose, seems most ancient to me, and since it requires a modicum of daily attention, it seems like a long lost relative. The recipe from Breadtopia uses a pound of flour, white mixed with whole wheat, and bakes slightly hotter than the Lahey method. I think the crust had a better texture do to the higher temp, it certainly had better color. Since I had the bit of rye in the starter, I could absolutely taste the trace of rye in my final bread. Truth be told, I couldn't wait until the bread was fully cool to cut into it... I was way too excited. But, the crust was fantastic, and the crumb a creamy, custardy and wheaty blend of flavors that even my Husband liked. (Boy-O not so much, he even tried it three times, trying to like it - so that impressed me!) By the time lunch was over, only half a loaf remains. My lunch today? Bread, Swiss cheese, an apple, and kombucha.


If you have any trepidation from trying to make a yeasted bread of any sort, I hope you will be inspired to try or try again. I think back to a month ago and remember that I was thinking to give up on my starter and start again. It's a living process, and as with any living thing, there are no exact sciences or methods there are only suggestions and more suggestions. I'm happy that I found Breadtopia to give me that extra nudge of encouragement when I was looking for more advice yesterday. (They also have a nice shop with reasonably priced bread making accessories.) It's also so nice to re-discover that bakers in general are a helpful and curious type, willing to help or offer troubleshooting should you need it.

Now that I know my starter is capable of rising bread with no help from commercial yeast, I feel fearless in new experimenting. I also feel like telling all the neighbors that my starter is ALIVE and it works! Who knows, I probably will if I can work it into conversation... Meanwhile, I can obsess at length here at CakeWalk.


(This post has been YeastSpotted.)

Monday, October 11, 2010

Vegan Monday: Chocolate Sourdough Cake

I think this is my favorite vegan cake to date. It's not so sweet, and has an elegant almost brownie-like denseness. So many times, I think I make the mistake of wanting vegan bakery to taste like their animalistic counterparts: too sweet and too decadent for daily consumption. But while this cake could be doctored into supreme richness, it's mild cocoa and whole grain appeal can easily become a daily cake indulgence that you don't have to feel too bad about.


The base recipe is called "Sourdough Chocolate Devestation Cake", and I found it here. I guess I was beguiled by the name, since I actually found the recipe a bit disorganized, and could find no true author. But, I was convinced that the bones of the recipe were sound, and I did want to continue using my sourdough starter (which does have that habit of growing quickly) in my daily kitchen life. I also decided that instead of making the recommended glaze, which was served on the side anyway, I would make a new batch of chocolate syrup to drizzle under, on and around it.

I used Omahene (natural process) cocoa and raw sugar in my chocolate syrup this time and was impressed with the flavor so much more than normal. Even without corn syrup, I was also impressed that I have no "syrup crystallization issues", and I wonder if it is because I used Dutched cocoa last time? The raw sugar may play a part, too - I have become so enamored of it, I can't see myself ever going back to white granulated.

The original recipe also was enough for 2 9-inch layers, so I based my version on a half recipe. I like to save layer cake for birthdays and company, not for eating daily, mostly on my own... But if one needed a vegan layer cake, this is the recipe, since it makes perfectly beautiful, flat layers and boasts a tight crumb making it easy to cut into perfect slices.


I thought about Alton Brown a lot when mixing up this recipe, since I broke two of his cardinal rules of baking: A) adding the dry ingredients to the wet and B) treating sugar as a dry ingredient instead of a wet ingredient. I was happy with my result, but feel free to mix up a cake whatever way you prefer! I also had originally used 1/2 cup of raw sugar only, but when I tasted the batter, it needed more sweetener. It is a cake, after all and not a plate sized muffin. If you wanted to up the ante even more, add some mini vegan chips to the batter.

Chocolate Sourdough Cake (adapted from Family Oven)
makes 1 9 inch cake layer, easily doubled

Wet Ingredients:
  • 1/2 c. sourdough starter
  • 1/2 c. plus 1/3 c. water
  • 1/2 c. coconut oil, melted
  • 1/2 t. vanilla
  • 1 T. instant espresso powder
  • 1 T. cider vinegar
Dry Ingredients:
  • 1/2 c. whole wheat flour
  • 3/4 c. ap flour
  • 1/4 t. cinnamon
  • 1/4 c. plus 3 T. cocoa
  • 1/2 t. soda
  • 1/2 c. raw sugar
  • 1/4 c. dark brown sugar
Preheat oven to 350.

Combine wet ingredients in a large bowl. In a medium bowl, combine dry ingredients. Add the dry to the wet (the sourdough starter makes the wet ingredients kind of sticky), and mix until just combined, yet thoroughly mixed. (I recently got this whisk from King Arthur Flour, and I can't tell you how much I love it!!)

Pour batter into a 'prepared pan', one that is greased and floured or sprayed with a flour spray. Bake 20-28 minutes until tester comes out clean. Let cool in pan for 10 minutes before removing to wire racks to cool completely.


The cake could be considered a "little on the dry side", but I actually love it as is. Non-Photo-Op slices got a heavy dousing of chocolate syrup, and it sinks in nicely as you eat it, though it tends to slide off the surface and pool seductively around the base of the cake. Last night, I tried a piece first spread with peanut butter and then topped with chocolate syrup. I had to recreate it this morning in natural lighting:


I'll try not to eat it until after lunch. It is also day four of this cake, mind you. I think that sourdough is a great addition to baked goods, so far as my beginning experiments can attest. My new theory is that it acts as an innoculator, like whey, and not only adds that layer of tenderness but also of preservation. I just like the fact that it lives on my counter, and can find it's way into a lot of different things. A perfect friend for me as the colder months are coming up quickly, and I like the excuse to run the oven...

Friday, October 8, 2010

Sourdough Pancake Experiment

Because I was so excited with the success of my pretzels the other day, and because I'm certain that my sourdough starter is starting to have the good behavior of a properly maturing adolescent starter, I had to try making another quickbread. Though lately I was passionately in love with the waffle, pancakes are really where it's at for this Midwestern lass. So, branching gingerly out, I chose a sourdough pancake with a long rise - indeed you can leave it up to 24 hours if you wish - and couldn't be more pleased with the result!


I received an encouraging email back from the bakers at King Arthur Flour yesterday. I contacted them wondering if they had any tips for the sourdough starter I've been working on. I am a devoted KAF flour user, and even though I don't typically splurge on their organic flours, I use their AP flour, bread flour and whole wheat flours exclusively. I get my specialty flours from the Outpost bulk bins, since I can get them in small amounts and they are always fresh.

According to a recent catalogue article I read, King Arthur does purchase wheat solely from US farmers who also have good sustainability practices in place. Aside from being the oldest flour company (1790!), they also have demanding standards which ensure that even from crop to crop and year to year, their flours are consistent in composition. I love that they are an enormous company, yet answer every individual question - and have painstaking amazing recipes. I was so happy to hear from Frank, who assured me that sourdoughs are unique to their environments, and that mine probably just needs a bit of rye flour here and there to thrive and do his best.

For about a week now, I've been feeding my starter with one feeding of rye every 4 or 5 feedings (I feed twice a day), depending on if it starts looking sluggish or not. I can't believe how it grows between feedings now, and is deflated when I stir it. I also can't believe how light it makes baked goods.

These pancakes are entirely whole grain, yet they were extremely light. I usually eat 2 (4 inch) pancakes when I make them using AP flour, but ate 4 of these without even blinking. The Boy-O had me beat, he ate 5 for breakfast this morning, and I actually had to tell him that he couldn't eat any more. I also think they were so delicious since I fried them in a cast iron skillet brushed with ghee. I made ghee yesterday for the first time, and am hooked. It's slightly nutty flavor was so great, especially baked onto the outside of a healthy pancake!


I finally found that straining the ghee after 10 minutes of rest through a coffee filter was the best way to strain it...

I found the original recipe for sourdough pancakes at The Nourishing Gourmet. Kimi Harris has a great site, full of great recipes for whole foods, and quite a lot of information on healthy eating. I cut her recipe in half, and even at that, had 8 leftover pancakes. I'm sure they will toast up well tomorrow. I also think these would be excellent as little blini pancakes, topped with caviar or smoked salmon and creme fraiche even cream cheese topped with slices of cucumber, radish and dill. They are pretty amazing just plain with maple syrup, too.


Mix up the starter portion at least 3-4 hours before you want to eat pancakes, or really anywhere between 3-24 hours. I started mine last night before bed, and it was ready to go by 7 this morning, even in a pretty chilly kitchen, since I forgot to close the window last night...

Sourdough Pancakes (adapted from Kimi Harris, The Nourishing Gourmet)
makes 18-20 4 inch pancakes

For the starter:
  • 1/2 c. starter
  • 1 c. water
  • 1 3/4 c. multi grain flour (I used 1/2 c. whole wheat, 1/2 c. barley, 3/8 c. (6T.) cornmeal, and 3/8 c. rye flour)
To make the pancakes:
  • 2 eggs
  • 2 T. maple syrup
  • 2 T. olive oil
  • 1/2 t. baking soda
  • 1/2 t. salt
3-24 hours before you want pancakes, mix the ingredients for the starter in a large bowl. Make sure it's big enough to accommodate some rising action. When pancake making time comes, add the rest of the ingredients, and stir until just mixed. You can adjust the consistency of the batter if you like by adding a bit of water or milk.

Fry in a hot pan, preferably cast iron, as you do with pancakes. Try not to eat them all at once.


Armed with new confidence in my starter, I think I'm going to keep feeding it as I have been for the past week: watching for sluggishness and fortifying with rye for about a month before starting to work on another bread. I think my starter needs to acclimate to me and my kitchen, and gain his own confidence in his rising capabilities. And I hate to say it, but I think that my next loaf of bread may come from a King Arthur Flour recipe and not one from Nancy Silverton. I hope she'll forgive me.

Tuesday, October 5, 2010

Sourdough Experiment: Pretzels (or In Which My Confidence Grows Exponentially)

Here it is: the first truly edible (Non-Waffle) thing I've made with my wild yeast starter.


I feel like I've been struggling in my kitchen lately. A full blown skirmish, if not an all out war. I have a family of picky eaters, except for myself, and then I had this new baby of a starter I was trying desperately to conjure up out of the wildness of Wisconsin. I was patient, feeding my struggling starter 3 times daily. After 2 weeks of fairly consistent results (bubbly starter culture with no rising capabilities), I decided to punctuate my white flour starter with rye.


Rye starter on the left, AP flour starter on the right.

Rye flour naturally contains more yeast than white, so I figured it couldn't hurt. But since I didn't want to lose any of my stalwart white starter progress, I portioned the white starter into two one morning, and then began feeding half of it 50 grams each of rye flour and water at every feeding. I also knocked back my feeding to twice daily, since I am usually always home between 7 and 9 both a.m. and p.m. (Every morning, I begin anew with 100 grams of starter, leaving plenty of excess to make delicious waffles with!) Within two days of my new schedule, rye starter (left above - makes THE best waffles, by the way) was more than doubling between feedings. When I stirred it, it actually deflated - signs that it isn't just my wishful thinking, it is indeed up to the task of reproducing! So straight away yesterday morning, I began my first experiment: sourdough pretzels.

The dough is impossibly dry by design. My KitchenAid actually had a hard time keeping up - but since I followed Nancy Silverton's direction, I let it knead only until it hit the proper temperature: 75-76 degrees f. On my Professional 600 model, that was about 3 minutes.


This dough is actually very similar to bagel dough. While Silverton states that you could actually knead it by hand, I don't know if it would be so advisable. I actually felt like I was doing aerobic exercise just rolling out my "snakes" of dough to about 20 inches. The elasticity of the dough scared me, and in spite of my intrepidity with my starter, I wasn't even sure that my project was going to work despite it's handsome first appearance:


Like the bagels, these pretzels hang out in the refrigerator for 18-24 hours prior to actual baking. Plenty of time for me to obsess over whether or not my pretzels were going to be worthy of my expectations of them. Nancy has high expectations... I love that she is so specific in her pretzel love, that she needs fat and thin parts to prevent boredom. She includes direction about making a "belly" 3 inches in the center of the snakes when you roll them, so that there are noticeable fat and thin parts. She also dips them in lye, an experiment that I opted to leave for another time. I could just see myself at Walgreen's asking for food grade lye... they'd probably make me sign a waver.

Brushing the tops with egg wash was just fine for me. I sprinkled with Kosher salt, and slid them into the oven immediately, as directed, so that it wouldn't melt. It stayed pleasantly crunchy, and the pretzels themselves are chewy yet cake-like and certainly reminiscent of the sourness of the starter.

These are infinitely better than mall-staple pretzels (that I only know the taste of since my Husband has to eat them whenever the rare occasion that we actually frequent a Mall...). The Boy-O ate a whole one after school, too - and immediately wanted a second. So, happily, they have the picky eater seal of approval even at room temperature.


Sourdough Pretzels (adapted from Nancy Silverton)
  • 6 oz. (about 1/4 c.) cool water - 70 degrees f.
  • 9 oz. (about 1 c.) starter (I used half rye starter and half white)
  • 1 lb. 4 oz. (about 5 c.) AP flour
  • 1 T. barley malt syrup (don't omit this)
  • 2 teaspoons sea salt
Place all the above ingredients in a stand mixer fitted with a dough hook. Mix on low speed for 1-2 minutes to combine. Turn up mixer to medium, and mix until the dough is smooth, elastic and firm, and reaches the 75-76 degree mark on an instant read thermometer.

Turn the dough out onto an unfloured work surface, and cut dough to divide it into 3 oz. portions. (Nancy's recipe states it yields 18, but I got exactly 12 3 oz. pretzels.) Tuck the ends of the dough under (form rough balls), cover with a cloth and let rest for 45 minutes.

Working with one piece of dough at a time and keeping the rest covered, roll a snake (or a rope if you prefer) about 10 inches long. (I'm going to quote Nancy here, since she is succinct: "Avoid using flour. If there is not enough friction between the dough and the work surface, spritz the work surface lightly with water from a spray bottle. As the rope begins to stretch, uncross your hands and continue rolling with light, even pressure, moving your hands slowly to the ends of the rope without tapering the ends. leaving a center belly 3 inches long, place the palms of your hands on each side of the belly, and roll and stretch again to elongate the cylinder to about 20 inches. Lay your hands on top of each end and taper the ends by alternately rolling each one toward and away from you (think of the arm motions of a cross-country skier).")

Form into pretzel shape, leaving a 1/4 inch overhang with the tapered tails. Transfer to a parchment lined baking sheet, cover with a cloth, and let sit at room temp " just until they show signs of movement", about 1 hour.

Place each baking sheet into a plastic trash can liner and refrigerate for 12-24 hours.

One hour before baking, preheat oven to 400 degrees. Remove the trays of pretzels from the fridge, and brush with an egg yolk mixed with a splash of water. Sprinkle them with salt, and immediately transfer to oven. Bake 20-25 (or a little longer) until they are a deep golden brown, rotating the sheets if necessary. (I suspect the mahogany brown she calls for comes from the lye dip prior to baking.)


These pretzels are not for those who prefer not to chew. They have resistance and good flavor; they would be equally good with cream cheese and honey or cinnamon or with cheese or mustard.

Meanwhile, my excitement is limited, since I'm intrepid to begin another loaf of bread - one that relies on the lifting power of natural yeast and not on dense chewiness to satisfy me. I feel like I have gained some confidence, and I do have some emails in to King Arthur Flour and another Chef source to see if I can glean any one-on-one knowledge.

Sometimes the Internet is overwhelming. Sometimes people on the Internet say or state things that aren't quite the truth, or better, want you to pay to get information from them. Not that I'm calling sourdough cultivators thieves or anything, lest you think I have become embittered of the Brave New World of Internet relationships... But sometimes, I wish the World Book encyclopedia salesman would still be hawking door to door, and that outside of my library, I'd need to go talk to a baker somewhere to get the answers I need to be content. Outside of attending a Baking and Patisserie school, which I don't feel is in the cards for me right now, I'm not sure what else to do. If you have ever grown, baked or obsessed about a sourdough culture, and feel like talking about your experiences, please let me know!

Friday, October 1, 2010

Adventures in Cup Tasting...

Yesterday, I tried my best when I competed in the inaugural City Wide Cup Taster's event held by Alterra. The object of the contest was simple: of each trio of brewed coffee, the contestant chooses the cup that is not like the others. The face off was made a bit more challenging by competing head to head with another taster, tasting 4 sets (of 3 cups each), and doing it accurately while being timed. Though a 5 minute cap was given, most tasters were able to nail down their choices within 2 to 3, with some snappy tongues nailing them all spot on in under a minute.


Alterra Prospect's new patio

The coffees were also brewed meticulously to the same strength, and the same coffees were used in all of the brackets. Then, all 24 tasting cups per set of contestants were wheeled to the tasting area, given time to cool a bit and sucked up (noisily, or not) by the competitors.

I didn't really know what to expect when trying to identify the odd cup, but I don't think I was expecting them to be as similar as they were. And, I didn't anticipate myself feeling quite as nervous as I was... like I knew I was about to fail a test that I had studied weeks for. I didn't actually do any preliminary studying so to speak, I just tried not to eat any wicked hot peppers on anything for a few days. (That's actually kinda hard to do.)

The staging area.

As I watched the left hand side of the brackets, the mostly Alterra employees seemed professional to me in their slurping styles: bent at the waist and hovering closely over the cups, tasting spoons in hand. I did expect them all to pretty much nail every set, but some did and some did not. It was explained that the differences in coffee are easier to taste as the liquid reaches body temperature - which I did find to be true personally. I won my first bracket, but perhaps because the coffee was easier to taste due to a cooler temperature on my next round, I felt like I tasted them faster and more confidently, and then was promptly eliminated.


I didn't feel too bad, since I did have a great time and was finally able to put a name on so many familiar Alterran faces that I've seen over the years. And, just before I took off, I got a stack of lightly used green coffee cups - since I was feeling kind of crafty. Occasionally, I have too much time on my hands and make recycled scenes out of coffee cups. Yep. Pretty labor intensive. Especially since I tend to be a perfectionist with this sort of thing. If you fancy having a recycled box of Alterra art for your very own, keep an eye on my flickr photostream, and when I complete my next one, I will be giving it away to a flickr commenter!


It was a Wonka-like Christmas, looking under the cups to see if that little red dot was under my choices, funny also that I could remember which cups I knew full well were frustrated guesses and which ones I believed heart and soul to be correct. That's the luck of the draw in cup tasting, especially under duress of the ticking clock. I sure hope I'll be able to do it again sometime.